
The so-called “vinyl tiles“ are a coating that is easy to install, economical and decorative. These ’tiles’ are the ideal solution for covering walls without work and on a low budget. We’ll tell you everything!
- WHAT ARE ADHESIVE TILES?
There are two types of adhesive tiles: vinyl tiles, glued on the tile we already have or on a smooth surface. Although sometimes called ’tiles’, they are vinyl pieces that imitate the tile’s finish. On the other hand, there is the decorative mesh, a flexible and cut-out part made up of a square or rectangular set of tesserae that can be cut with a cutter or scissors and adheres to any surface. You will find them in standard one-piece packages, although the measurements of each packet depend on the manufacturer.
- ADHESIVE TILES DO NOT NEED GLUE
Both the adhesive vinyl and the decorative mesh are self-adhesive. So they do not need glue or any other adherent material, peel off their back and stick them as if they were a wall sticker or decorative vinyl. That easy!
- A MATERIAL FOR EACH ROOM
Adhesive decorative meshes can be made of tesserae of a single material or a combination of different types, such as stone, ceramic, fibreglass, steel, and wood. Depending on the type of room where you want to place them, you must choose one material or another. You can find various establishments such as Leroy Merlin or Smart Mosaic.
- ADHESIVE TILES WITH CERAMIC FINISH
They are the most common. You find them forming a grid with bubble decoration or imitating a chessboard. This type of mesh is perfect for placing in bathrooms and kitchens, both indoors and outdoors, as this material is highly resistant to moisture.
- ADHESIVE TILES WITH GLASS FINISH
Square or rectangular and in various colours, their main asset is to provide light to the walls through a combination of matt and gloss finishes. With a medium resistance to scratching, it is not advisable to apply it outdoors.
- ADHESIVE TILES WITH STONE FINISH
They have a raw image, imitating stones such as marble. Indicated for interiors and exteriors, walls and floors, they even serve as a shower tray if an anti-slip product is applied to them. In the photo, Alveolar Mármol cladding by Leroy Merlin is made of matt white PVC with an embossed finish from edge to edge. It improves acoustic well-being; it is fixed with self-adhesive and can be used anywhere in the room and damp places.
- STEEL FINISH ADHESIVE TILES
This type of finish for adhesive tiles can be applied as a kitchen backsplash, combining its ease of installation with the hygienic and resistance benefits of steel. In addition, it is decorative and bright. In the image, Hexagonsilver self-adhesive mesh from the Smart Mosaic brand
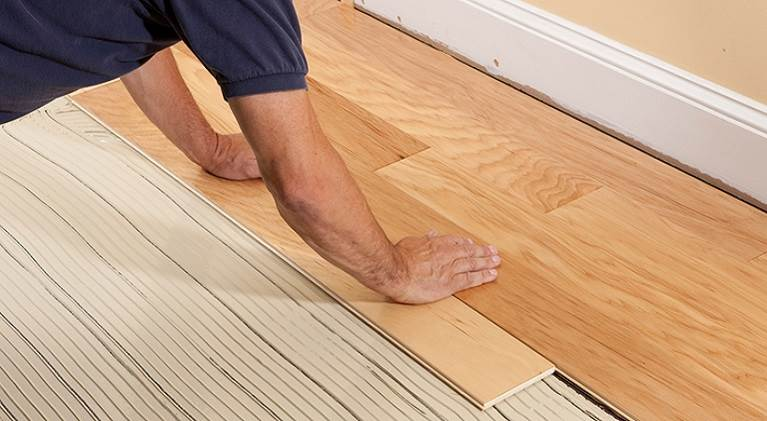
- WOOD FINISH ADHESIVE TILES
This type of tile can even have the appearance of wood, like the one in the image, which belongs to the Smart Mosaic Brickwood collection and is vinyl. Due to this condition, it can be installed even in wet areas.
- ADVANTAGES OF ADHESIVE COATINGS
The advantages they offer are many: they are very resistant to weather, waterproof and suitable for kitchen and bathroom. All this is thanks to its ability to resist humidity, steam and water; They are comfortable, easy and quick to install and can be glued and peeled off directly on the tile without having to remove it.
- DISADVANTAGES OF ADHESIVE COATINGS
Until relatively recently, they were considered the “ugly duckling” of coatings. His appearance was perceived as too artificial and of low quality. Thanks to the new technologies applied to their production, adhesive tiles have positioned themselves as an attractive alternative.
- WHAT IS ITS THICKNESS?
One detail you should not ignore is the thickness of the decorative mesh, which you can find between 4 and 8 millimetres since each DIY job will need one consistency or another. The smaller the surface to be covered, the finer the mesh of adhesive tiles must be.
- INSTALLATION POSSIBILITIES
You can cover an entire wall with them or just a part; leave a column or place a border. Once you have placed your decorative meshes on the wall, you can finish off your work with a listello, a square or an edge cover (red-paste moulding -ceramic- that is used to give the edges a perfect finish); or failing that, with an aluminium, PVC, stainless steel or wood profile (intended for external corners to protect the borders).
- ARE TRENDY
It is becoming more and more common to see this type of adhesive vinyl to create the hydraulic tile effect in the kitchen or bathroom. If the house’s walls bore you, it’s time to make changes without work! You can add graphics or hide the old tiles with this coating that sticks in no time.
The so-called adhesive ’tiles’, which can be vinyl or decorative mesh of different materials, offer various finishes, imitate ceramics, textiles and wood, have both acoustic and thermal insulating power, and are 100% resistant to humidity. In addition, they can be placed on various surfaces such as painted walls, tiles, gotelé, plasterboard, wood and floors. And they have something in common: they are sticky, like stickers.
Of course, not to be confused with tiles, as specified by ASCER, the Spanish Association of Manufacturers of Ceramic Tiles and Pavements, since tile is the term referring to the ceramic material used in cladding.
HOW TO LAY ADHESIVE TILES?
This is an easy, clean job that will take about 30 minutes. Due to their flexibility, they can be adapted to surfaces with holes or any irregularity. You’ll need:
- vinyl wall sticker
- cutter
- Pencil
- Rule
- Meter
- Level
- Gloves
Before starting, the boxes must be left in a horizontal position for at least 24 hours so that the material adapts to the environment. The surface must be clean and dry. If the surface is concrete or any porous material, a primer should be applied to dry out the pores.
With the help of a ruler, a pencil and a level, you have to mark the central point of the wall and draw two cross lines. This mark will serve as a guide for laying the first tile. You have to place the adhesive in the gun to apply points in the holes of the sheet that cover the back of the PVC piece.
The protective foil must be carefully removed. This will have added more points of adhesion to the self-adhesive base. Subsequently, the tile must be placed in one of the quadrants following the drawn line. You have to press well with your hands to ensure the adherence of the tile.
Then, the centre of the second piece must be marked and placed, resting it on the edge of the previous one, avoiding the joints coinciding. The tiles will continue to be identified, always supporting them on the edge of the previous ones.
Making cuts:
- To make the cuts, you must measure the gap at the top and bottom. The measurements will be transferred to the tile, and it will be cut by separating the two parts with your hands.
- It is necessary to check that the cut piece fits
- well before removing the protection sheet. Proceed the same way with the rest of the tiles until the entire wall is finished.
HOW DO YOU CLEAN ADHESIVE TILES?
Depending on the type of material with which your cladding is made, you will have to attend to some cleaning care or others:
Steel: clean with a damp cloth and neutral soap.
Ceramic: it is elementary to clean. Resistant to cleaning products.
Glass: resistant to cleaning products. Use a wet cloth and a neutral detergent.
Stone: clean only with a slightly damp cloth as it does not tolerate cleaning products.
Plastic or PVC and vinyl: easy to clean and waterproof. Resistant to cleaning products